Many people use Windows 11 and Windows 10, but not everyone likes Bing Search. When you search for something in the Start menu or taskbar, Windows also shows results from the web using Bing. This can be annoying, slow down your computer, and even raise privacy concerns. If you want to remove Bing Search from Windows 11 and 10, there are many ways to do it.
You can turn it off using Windows Settings, Registry Editor, or Group Policy Editor. In this guide, we will show you easy and safe methods to completely disable Bing Search from your computer.
Understanding Bing Search in Windows
Windows includes Bing Search in the Start menu and taskbar to show both local and web results. When you type something, Windows automatically searches online using Bing. While some people find this helpful, others find it slow, distracting, or a privacy issue.
If you prefer using only local search without web results, you need to disable Bing Search from your Windows settings.
Why Remove Bing Search from Windows 11 and 10?
Many users want to remove Bing Search because it makes Windows Search slower. Every time you type in the Start menu, Windows looks for results both on your PC and online. This can cause delays, especially on older computers.
Another reason is privacy. When you search, Windows sends your queries to Bing servers, which some users don’t like. Also, some people prefer using Google or other search engines instead of Bing.
By disabling Bing Search, you can make Windows faster, more private, and focused only on local files and apps. Let’s look at how to do it!
Method 1: Disable Bing Search Using Registry Editor

The Registry Editor lets you change Windows settings, including turning off Bing Search. Follow these steps carefully:
- Press Windows + R, type regedit, and press Enter.
- Go to this location:
HKEY_CURRENT_USER\Software\Microsoft\Windows\CurrentVersion\Search - Find BingSearchEnabled, double-click it, and set the value to 0.
- Find CortanaConsent, double-click it, and set the value to 0.
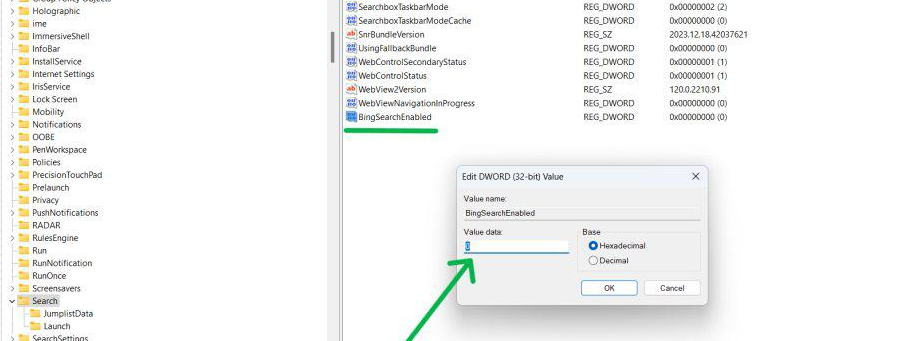
6. Restart your computer.
Method 2: Disable Bing Search Using Group Policy Editor
If you use Windows 11 Pro or Windows 10 Pro, you can disable Bing Search using Group Policy Editor:
- Press Windows + R, type gpedit.msc, and press Enter.
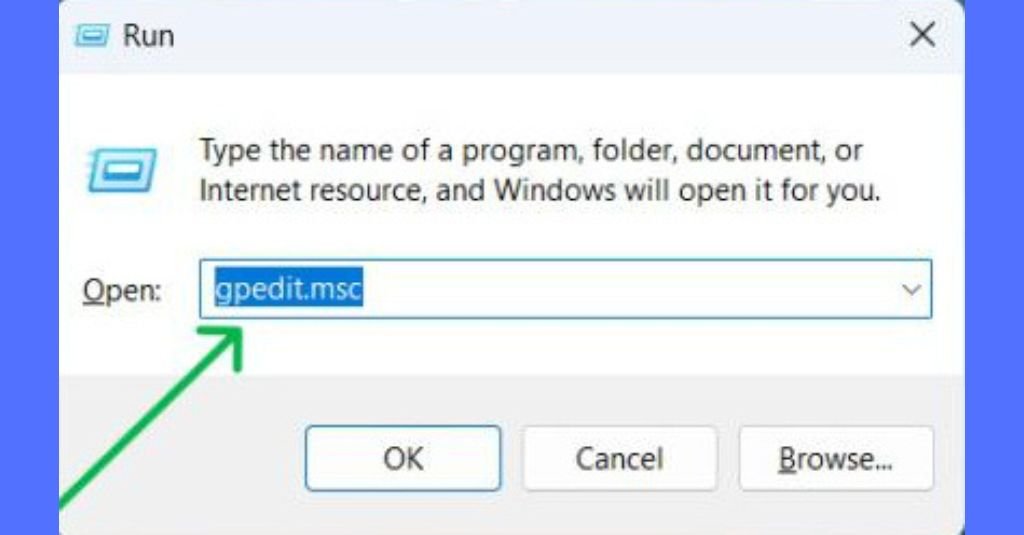
2. Go to Computer Configuration > Administrative Templates > Windows Components > Search.
3. Find “Do not allow web search”, double-click it, and select Enabled.
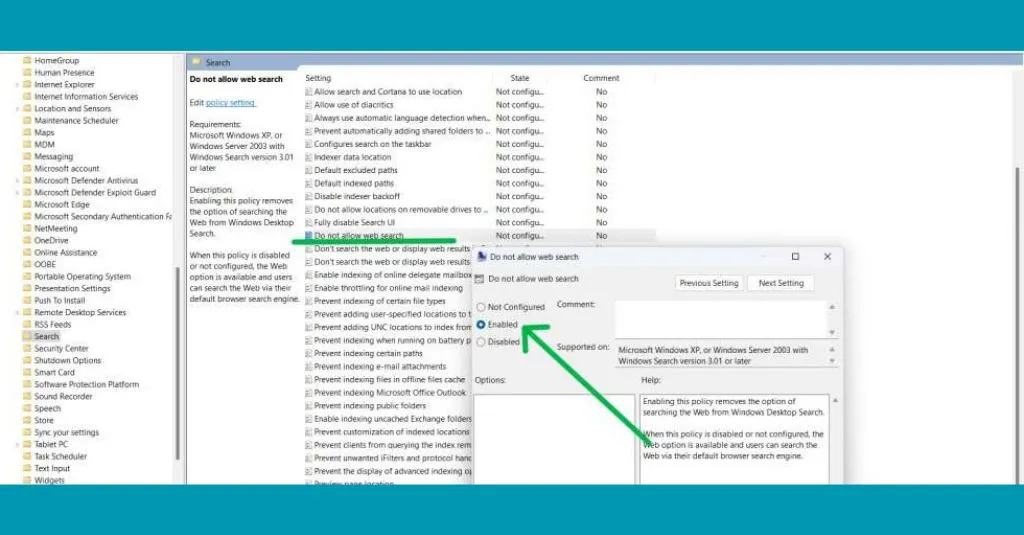
4. Restart your computer.
Now, Bing Search is completely turned off!
Method 3: Turn Off Bing Search from Windows Settings
If you don’t want to use Registry Editor or Group Policy Editor, you can disable Bing Search from Windows Settings:
- Open Settings and go to Privacy & security.
- Click Search permissions.
- Under Cloud content search, turn off Bing Search options.
- Restart your PC.
Now, Windows will only show local search results without Bing!
Method 4: Remove Bing from Microsoft Edge
Since Microsoft Edge uses Bing as the default search engine, you can change it to something else:
- Open Microsoft Edge and go to Settings.
- Click Privacy, search, and services.
- Scroll down to the Address bar and search.
- Change the search engine to Google, DuckDuckGo, or another option.
Now, when you search in Edge, Bing will no longer be used!
Method 5: Block Bing Using Windows Firewall or Hosts File
You can block Bing Search completely by stopping it from connecting to the internet:
- Open Windows Firewall and block bing.com.
- Edit the Hosts file by adding this line:
127.0.0.1 www.bing.com - Save the file and restart your PC.
Now, Windows won’t be able to connect to Bing, fully disabling web search!
Method 6: Uninstall Bing-Related Applications
Some Bing-related apps may still be on your computer. To remove them:
- Open Settings and go to Apps > Installed apps.
- Search for Bing, Bing Bar, or Microsoft Bing Service.
- Click Uninstall next to any Bing-related apps.
- Restart your PC.
This helps remove any remaining Bing services from Windows!
Alternative Search Options for Windows
If you remove Bing Search, you might want a better search tool for your PC. Here are some great alternatives:
- Everything – Super-fast file search.
- Listary – Smart search with shortcuts.
- Open-Shell – Classic Start menu with a better search.
These tools help you find files quickly without Bing or web search slowing you down!
Privacy and Security Considerations
Disabling Bing Search improves privacy by stopping Windows from sending search queries online. It also makes your PC faster by focusing only on local files.
However, Microsoft may still collect some data through other services. To improve privacy, you can:
- Disable Telemetry in Windows Settings.
- Use a privacy-focused search engine like DuckDuckGo.
- Adjust Microsoft account privacy settings.
This helps keep your data safe!
How to Re-enable Bing Search if Needed
If you ever want to restore Bing Search, follow these steps:
- Open Registry Editor and change BingSearchEnabled to 1.
- In Group Policy Editor, set “Do not allow web search” to Not Configured.
- Turn on Cloud Content Search in Windows Settings.
- Restart your PC.
Now, Bing Search will work again in Windows 11 and 10!
(FAQs)
1. Will disabling Bing affect Windows Search?
No, Windows will still find your apps and files locally.
2. Can I remove Bing from Copilot AI?
Currently, Bing is built into Copilot AI, but Microsoft may allow changes later.
3. Is it safe to edit the Registry?
Yes, but always back up your Registry before making changes.
Conclusion
Removing Bing Search from Windows 11 and 10 makes your PC faster, more private, and more focused on local search. You can disable it using Registry Editor, Group Policy, Windows Settings, or other methods.
If you ever want Bing Search back, you can easily restore it. Try these steps and enjoy a cleaner, faster Windows experience! Let us know if you found this guide helpful!

Pingback: Top 10 New Windows 11 Features Coming in 2025 - techoden