The ability to identify our monitors is crucial in maintaining an organized and efficient workspace, especially as we integrate more screens into our setups. Naming our monitors allows us to easily distinguish between them, particularly in scenarios where we are utilizing multiple displays simultaneously.
When we set up to rename Monitors in Windows 11, we often encounter common issues where monitors are given generic names like “Display 1” or “Display 2”. This can create confusion, especially if we are trying to manage applications or adjust settings across various screens.
Unique identification becomes particularly important in our daily routines, whether in a professional or personal setting, where knowing which monitor corresponds to which task can streamline our workflow.
We might find ourselves in situations where we have different monitors for various tasks—gaming, productivity, or streaming. In these cases, it becomes increasingly important for us to rename monitors in a way that reflects their primary function or the role they play in our daily activities.
Steps to Access Display Settings
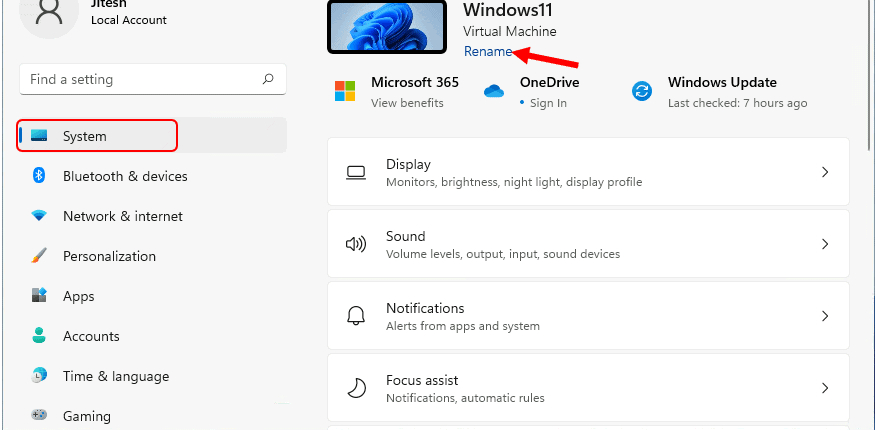
To rename our monitors, we must first access the Display Settings in Windows 11.
How to Right-Click on the Desktop
The process begins simply by right-clicking anywhere on our desktop background. This action opens a context menu that contains several options, from which we can select “Display settings.”
Navigating to the Display Settings Menu
Once we click “Display settings,” a new window will open, presenting us with all our connected displays. This menu provides a comprehensive overview of our monitor configuration, including options to alter display scaling, resolution, and orientation, as well as the ability to extend or duplicate displays.
Overview of Available Display Settings Options
In the Display Settings menu, all available monitors are displayed as numbered boxes. Here, we can click on each monitor to highlight them and access specific options associated with that display. The intuitive layout makes it easier for us to manage and customize our multi-monitor setup.
Renaming Monitors for Clarity
Once we’ve accessed the Display Settings menu, the next step is to rename our monitors.
Finding the Rename Option in Settings
To find the rename option, we need to select the monitor we wish to rename from the displayed boxes. After selecting a monitor, we can scroll down to see various settings associated with that particular display. Under the section labeled “Multiple displays,” we will find a “Rename” option.

Inputting New Names for Each Monitor
Clicking on the rename option will prompt a field for us to enter a new name. We can input descriptive labels like “Gaming Monitor,” “Work Monitor,” or “Streaming Monitor” based on the primary function of each display. This process transforms our monitors from confusing identifiers into easily recognizable names that enhance our workflow and productivity.
Saving Changes and Applying the New Names
Once we have entered our desired names, it’s essential to save these changes. We can do this by clicking the “Apply” button at the bottom of the settings window. After applying, the new names will be instantly reflected, helping to create a seamless identification system for our monitors.
Troubleshooting Monitor Recognition Issues
While renaming monitors is typically straightforward, we may encounter issues where our changes do not save.
Addressing Monitor Renaming Not Saving
If we find that our monitor renaming efforts are not being saved, the first step is to ensure that we are running the latest version of Windows 11. Updates often include patches and improvements that resolve recognition issues. Restarting our machine after renaming can also help solidify these changes.
Checking for Hardware-Related Issues
In some cases, hardware problems might hinder Windows 11 from recognizing our monitors properly. We should check all connections—cables, and ports—to ensure that everything is secure.
Additionally, trying different ports or cables might help isolate if a particular piece of hardware is causing the issue.
Reconfiguring Settings After Disconnect and Reconnect
If we’ve recently disconnected or rearranged our monitors, Windows might reorder them or revert to the previous settings. If this happens, we can return to the Display Settings and reassign names as needed. It’s wise to make physical changes to our setups before configuring names to minimize confusion.
FAQs
How can I rename my monitors in Windows 11?
To rename your monitors in Windows 11, right-click on the desktop, select “Display settings,” choose the monitor you want to rename, and find the “Rename” option within the settings. Enter your desired name, apply the changes, and your monitors will be renamed accordingly.
Is it possible to rename multiple monitors?
Yes, we can rename multiple monitors. Simply repeat the renaming process for each monitor individually by selecting them one at a time in the Display Settings.
What if my monitors don’t appear in the settings?
If our monitors do not appear in the settings, we should check the physical connections, and ensure that they are powered on and that they are compatible with our system. If issues persist, running the Windows Troubleshooter can help diagnose and resolve the problem.
Will renaming monitors affect their performance?
No, renaming monitors in Windows 11 is strictly a cosmetic change and does not affect their performance. It functions purely for our convenience and organizational clarity.
Conclusion
By renaming our monitors in Windows 11, we create an organized and efficient workspace that maximizes productivity. The steps to access the Display Settings are simple, and once we establish clear identifiers for each display, we can work seamlessly across our multi-monitor setup.
Troubleshooting can often resolve any issues with recognition or naming. Ultimately, the ability to rename monitors significantly enhances our user experience, paving the way for smoother workflows and better identification of our displays.